Somehow, I have ended up with my WordPress installations scattered over three different hosting accounts. This has been bothering me for a while, as I’m paying for three separate hosting accounts and I only need to be paying for one. To start the process, and as a form of catharsis, I thought I’d write a tutorial about how to migrate from one host to another. That way I feel like I’m doing something useful while actually I’m doing something boring.
To start with, I want to move my sites from GoDaddy to HostGator (my other sites are on Coolhandle who are even more useless than GoDaddy but I’ve got to start somewhere).
Before you get started it’s a good idea to tell anyone who works on the site that you’re migrating it and they should not make any changes to it until the migration is complete.
1. Backup your Database
First of all make a backup of your database. If you’re working on GoDaddy or something similar you’ll find your MySQL DBs under Databases > MySQL
Click the database you want to back up and enter the login details. Make sure you change your database type to English (UTF-8) when you log in.

Tip: If you can’t remember your database password you’ll find it in your wp-config.php file
Click on your database.

At the top you’ll see a tab that says “Export” click here.

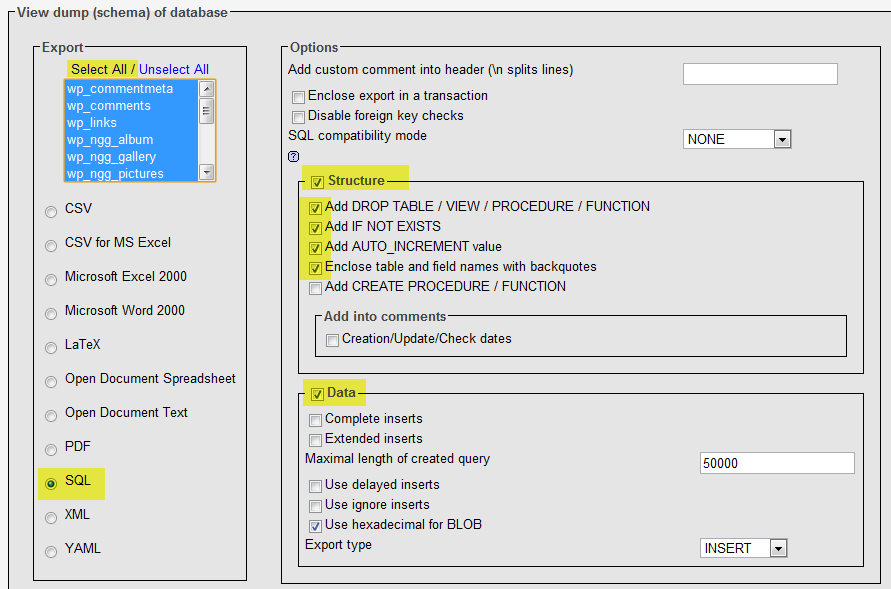
Now you’ll be presented with options of what you wish to back up. Make sure that all of your database tables are selected, along with SQL.

Under Structure, make sure that the following are selected:
- Structure
- Add DROP TABLE / VIEW / PROCEDURE / FUNCTION
- Add IF NOT EXISTS
- Add AUTO_INCREMENT’
- Enclose table and field names with backquotes

Make sure the “Data” checkbox is ticked.

You should end up with something that looks a bit like this:

Select “Save as File” and then click “Go”

Your database will back up. It may take a few minutes, depending on the size of your database.
2. Create Your New Database
Now I’m going to hop over to Hostgator where I’ll create my new database.
Log in to CPanel (or Plesk) on your new host and look for where you can create a new MySQL database. In Hostgator it’s about 2/3rds of the way down the page. Click on “MySQL Databases”.

Add the new database name.

Add a database user, or add an existing user to the database. I’m going to use one that I’ve already created.

3. Import Your Site’s Database
Once you have created your user return to your CPanel homepage. Scroll down until you find phpMyAdmin.

Click on the database that you want to access.

Look for the import tab at the top bar.

Browse for the file you want to import. Leave the character set as utf-8.

Make sure the Format is set to SQL. Click “Go.”
Leave it to do its thing.
Once it’s ready it’ll let you know. Your database for your site now has a new home on your new host (which isn’t stupid GoDaddy – w00t!)

Tip: if you are using a host which allows outside access to your MySQL databases you can use a trick from Vladimir Prelovac to avoid any downtime to your site. Unfortunately, it’s not going to work with Hostgator.
4. Download your Site
Open up your favorite FTP program and navigate to your site. Download all of the files onto your computer. This might take a while – go make a cup of tea!

Open up wp-config.php and update the MySQL details with your new database.
You will need to change the following:
- Db_name
- Db_user
- Db_password
- Db_host

5. Upload Your Site
With your new wp-config.php details inserted you’re ready to upload your site onto your server. Using your FTP program drag and drop the files you want onto your server.

6. Change Your Nameservers
Unless you have transferred your domain to your new hosting company, you’ll need to update your nameservers. This process can take anything from 2 hours to 48 hours.
Log into your Domain Manager. Select the site you want to edit and then click “Nameservers”

Click “Set Nameservers”.

You will get your new nameservers from your new host. When I signed up with Hostgator they came with the account info email.

Wait!
My site took about 10 minutes to transfer the nameservers – so you might be lucky! You can do a Whois lookup on DNS Stuff to see if your nameservers have moved.

And that’s it – your site is moved to your new host. Easy! Now I’ve only got another few dozen to do….
It gets a lot more complicated if you want to change your site’s domain. Want me to cover that too? Let me know in the comments – otherwise check out the WordPress Codex!
Related posts:
- How to Find the Hostname of Your Database Server When Installing WordPress The database hostname value is unique to your hosting company....
- Running SQL code on your WPMU database Taken from: The WordPress MU Manual Occasionally you will install...
- The Lazy Man’s WordPress Server Diagnosis Tool The Diagnosis plugin adds subpages to the Dashboard menu with...